
Some recipes just feel like a warm hug. For me, this classic Strawberry Rhubarb Pie Lattice Crust is one of them. The sweet berries and tart rhubarb just belong together. If you love simple, fruity desserts, you might also enjoy our easy recipe for strawberry yogurt bites.
It takes me right back to my grandma’s kitchen. I can still smell the buttery crust baking and hear the gentle bubbling of the fruit.

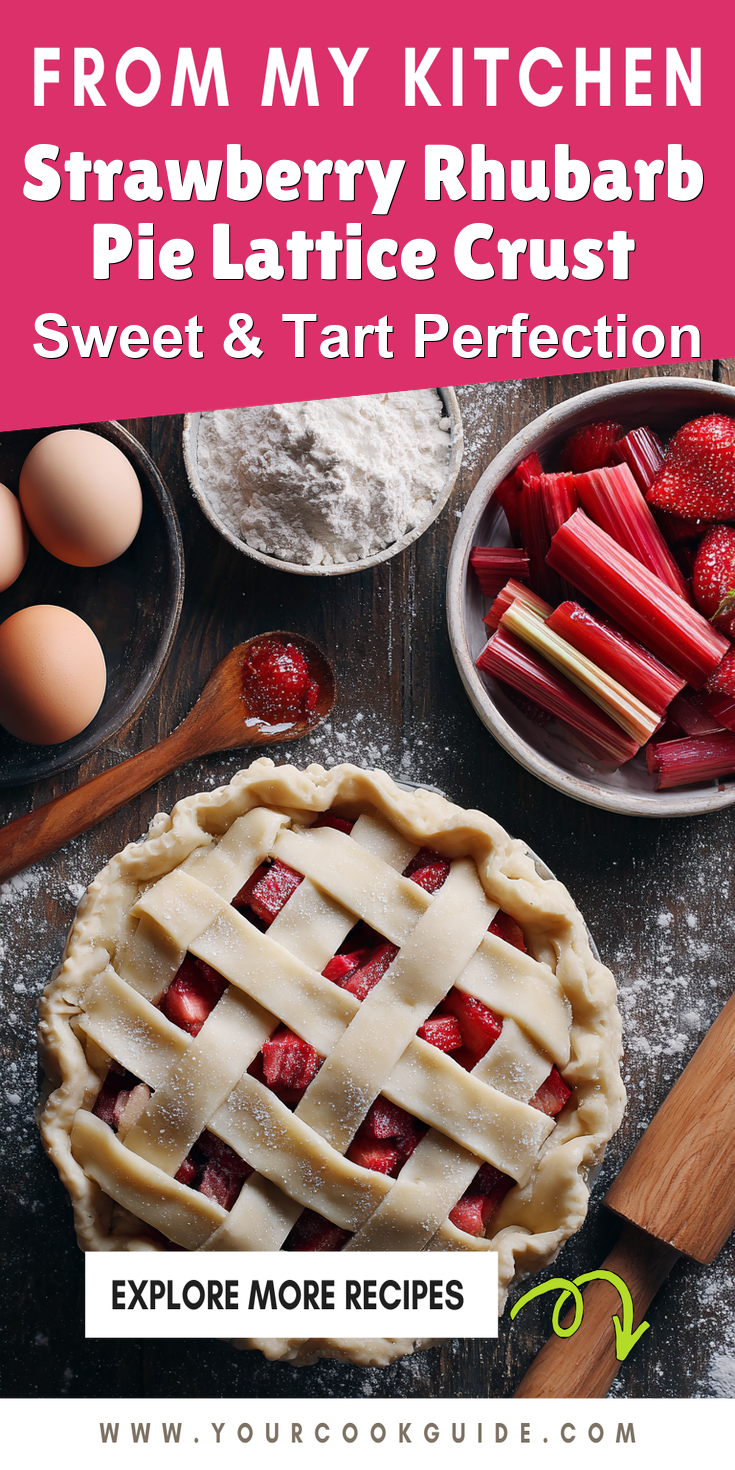
Making the lattice top might seem tricky, but I promise it’s worth it. It’s a beautiful, traditional finish for a truly comforting fruit pie. Let’s make a memory together.
Recipe Overview
- Cuisine: American
- Category: Dessert
- Prep Time: 45 minutes
- Cook Time: 1 hour
- Total Time: 1 hour 45 minutes (plus cooling)
- Servings: 8
The Story Behind This Classic Recipe
This pie is a true taste of spring and early summer. Rhubarb was one of the first plants ready in grandma’s garden.
She’d pair it with the first ripe strawberries from the patch. It was a celebration of the new season after a long winter.
The lattice crust wasn’t just for looks. It let the steam escape so the filling could thicken perfectly. It showed you took the time to make something special.
What Makes This the *Traditional* Way
We’re not using any fancy thickeners or shortcuts here. The real magic is in the simple ingredients and patience.
A good, old-fashioned double-crust pie is the goal. The filling gets its shine from the natural fruit pectins as it bubbles and cools. For another stunning dessert that pairs strawberries with a classic flavor, try this decadent Strawberry Chocolate Cake.
We use just enough sugar to balance the rhubarb’s punch. This lets the bright, tangy flavor of the fruit really shine through.
The Classic Ingredients (No Fancy Stuff!)
Gathering these simple ingredients is the first step. You likely have most in your pantry already.
Strawberry Rhubarb Pie Lattice Crust Recipe

The Classic Ingredients (No Fancy Stuff!)
How to Make It Just Like Grandma Did
Notes
Enjoy your homemade Strawberry Rhubarb Pie Lattice Crust Recipe!
Nutrition Information
- For the Crust:
- 2 ½ cups all-purpose flour
- 1 teaspoon salt
- 1 cup (2 sticks) very cold unsalted butter, cubed
- 6-8 tablespoons ice water
- For the Filling:
- 3 cups fresh rhubarb, cut into ½-inch pieces (about 1 lb)
- 3 cups fresh strawberries, hulled and halved
- 1 cup granulated sugar
- ¼ cup light brown sugar
- ⅓ cup cornstarch
- 1 tablespoon lemon juice
- 1 teaspoon vanilla extract
- ¼ teaspoon salt
- 1 tablespoon cold butter, for dotting
- For Finishing:
- 1 large egg, beaten with 1 teaspoon water (for egg wash)
- 1 tablespoon coarse sugar (like turbinado)
How to Make It Just Like Grandma Did
Take your time with each step. That’s the secret to a perfect, flaky crust and a set filling.
- Make the dough. Whisk flour and salt. Cut in the cold butter until pieces are pea-sized. Sprinkle in ice water, a tablespoon at a time, mixing until the dough just holds together. Divide in two, flatten into discs, wrap, and chill for at least an hour.
- Prepare the filling. In a large bowl, gently toss the rhubarb and strawberries with both sugars, cornstarch, lemon juice, vanilla, and salt. Let it sit for 15 minutes so the juices start to release.
- Roll the bottom crust. On a floured surface, roll one dough disc into a 12-inch circle. Carefully transfer it to a 9-inch pie plate. Trim the overhang to about ½ inch. Place the plate in the fridge.
- Create the lattice. Roll the second disc into a 12-inch circle. Use a knife or pastry wheel to cut it into 10-12 even strips, about 1-inch wide.
- Fill and weave. Take the pie plate from the fridge. Pour in the filling and dot with the tablespoon of butter. Lay half the dough strips vertically over the filling. Fold every other strip back and lay a horizontal strip across. Unfold the vertical strips. Repeat, alternating the folds, to create a woven lattice. Crimp the edges to seal.
- Bake to perfection. Chill the assembled pie for 20 minutes. Preheat your oven to 400°F (200°C). Brush the lattice with egg wash and sprinkle with coarse sugar. Bake for 20 minutes, then reduce heat to 350°F (175°C). Bake for another 40-50 minutes until the crust is golden and the filling is bubbling thickly. Let the pie cool completely on a rack, for at least 4 hours, before slicing.
My Tips for Perfecting This Classic
A few little tricks can make a big difference. They’re the kind of things passed down in family kitchens.
First, keep everything cold. Your butter, your water, even your flour if your kitchen is warm. This is the key to a flaky, tender crust that doesn’t shrink.
Second, don’t skip the cooling time. I know it’s hard to wait! But letting the pie cool fully is what allows the filling to set. A warm pie will run everywhere when you cut it.
How to Store and Enjoy Later
This pie is best enjoyed the day it’s made, at room temperature. Leftovers keep well covered at room temperature for a day.
For longer storage, cover it tightly and keep it in the fridge for up to 4 days. A slice warmed gently in the oven or microwave with a scoop of vanilla ice cream is pure heaven.
You can also freeze the baked and cooled pie. Wrap it well in plastic and foil. Thaw overnight in the fridge before serving.
Nutrition Notes
- This is a treat, meant to be enjoyed in celebration. The nutrition is for one slice.
- Calories: ~480
- Total Fat: 22g
- Saturated Fat: 14g
- Carbohydrates: 68g
- Sugar: 36g
- Protein: 5g
Your Questions About This Classic Recipe
Here are answers to a couple of common questions I get about this seasonal baking staple.
Can I use frozen fruit?
You can, but don’t thaw it first. Toss the frozen rhubarb and strawberries directly with the dry ingredients. You may need to add 5-10 minutes to the bake time.
My filling is too runny. What happened?
This usually means the pie wasn’t cooled completely. The cornstarch needs time to set as it cools. Also, make sure your filling is bubbling thickly in the center when you take it out of the oven.
What if my lattice strips break?
Don’t worry! Just press them back together. The dough is very forgiving. If a strip is too soft to work with, pop it back in the fridge for a few minutes to firm up.
I hope this recipe brings a little bit of that old-fashioned comfort to your table. There’s nothing quite like the smell of a fruit pie baking in your own oven. If you’re looking for a cooler, no-bake treat that captures the same strawberry joy, our Chocolate Strawberry Yogurt Bites are a perfect frozen delight.
It connects us to seasons, to gardens, and to the cooks who came before us. I’d love to hear about your pie-making adventures.
Did this recipe take you back to a special memory? Please share your stories, and let me know how your tart dessert turned out, in the comments below!
 Tired of the 5 PM dinner panic? Grab my new 30-Minute Cookbook!