
You’ve made red velvet cookies before. But you’ve never made them like this. I’m about to share the one secret that changes everything.
It’s not the cocoa hint or the red food coloring. It’s something simpler, smarter. This trick turns a good cookie into a legendary one.
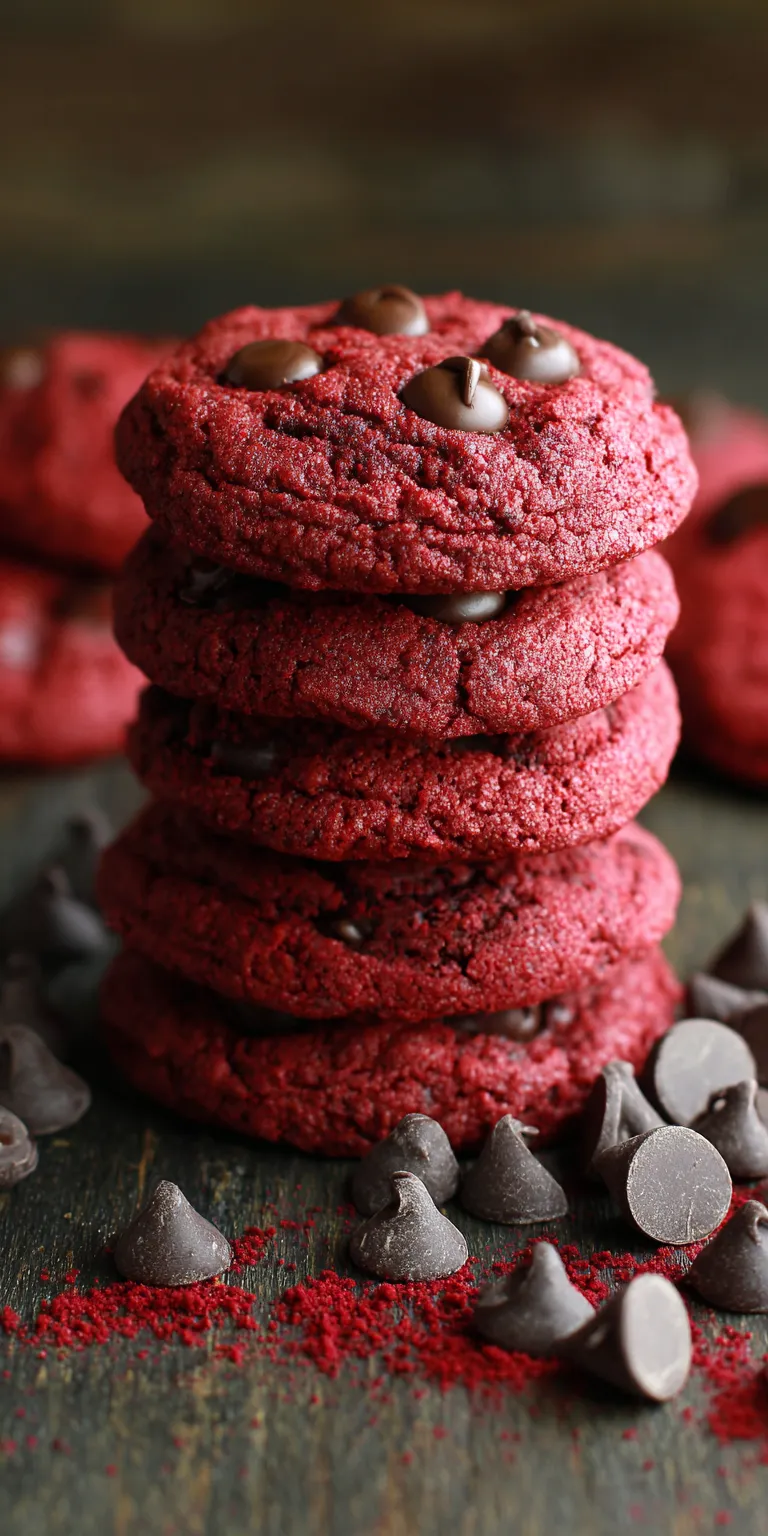
Ready to find out what it is? Let’s make the most stunning, flavorful Red Velvet Chocolate Chip Cookies you’ve ever tasted. They’re the perfect valentine dessert or any-time treat. If you love banana and chocolate, you might also enjoy our recipe for mini chocolate chip banana muffins for another bite-sized delight.
Recipe Overview
- Cuisine: American
- Category: Dessert, Cookie
- Prep Time: 15 minutes
- Cook Time: 10-12 minutes
- Total Time: 1 hour (includes chilling)
- Servings: 24 cookies
The Secret Ingredient That Makes All the Difference
Here it is: a tablespoon of cornstarch. I know, it sounds too basic. But trust me, this is the game-changer.
Cornstarch is my not-so-secret weapon for texture. It gives the cookie a soft, almost cake-like crumb that’s still chewy. It mimics that iconic red velvet cake texture in cookie form.
It works by tenderizing the gluten. This means a more delicate bite. Your cookies will stay supremely soft for days. Forget dry, crumbly cookies. This is the fix.
Why This Method is Better (My Pro-Tips)
I don’t use a cake mix hack. Starting from scratch gives you control. You control the cocoa quality, the red color intensity, and the sweetness.
My method hinges on two things. First, chilling the dough is non-negotiable. Second, we use two types of sugar for the perfect spread and chew.
Brown sugar adds moisture and molasses flavor. White sugar helps them crisp slightly at the edges. Together, they create the ideal cookie architecture. For another recipe that masters texture, check out our incredibly soft and moist bakery-style banana chocolate chip muffins.
The “Upgraded” Ingredient List
- 1 cup (2 sticks) unsalted butter, room temperature
- 3/4 cup packed light brown sugar
- 1/2 cup granulated white sugar
- 2 large eggs, room temperature
- 2 tsp pure vanilla extract
- 1 tbsp liquid red food coloring (use a good, potent one)
- 2 1/4 cups all-purpose flour
- 1 tbsp cornstarch (the secret!)
- 1/4 cup unsweetened cocoa powder (natural, not Dutch-process)
- 1 tsp baking soda
- 1 tsp fine sea salt
- 2 cups semi-sweet chocolate chips (or chunks)
The Pro-Method (Step-by-Step)
- Cream with purpose. In a stand mixer, beat the butter and both sugars for a full 3-4 minutes. It should be very light and fluffy. This incorporates air for lift.
- Add the wet team. Beat in the eggs, one at a time, fully incorporating each. Then mix in the vanilla and red food coloring. Scrape the bowl well.
- Combine the dry team. In a separate bowl, whisk the flour, cornstarch, cocoa powder, baking soda, and salt. Whisk for at least 30 seconds to evenly distribute everything.
- Combine carefully. With the mixer on low, gradually add the dry ingredients to the wet. Mix just until no dry flour remains. Do not overmix.
- Fold in the chips. Use a spatula to fold in the chocolate chips by hand. This protects the dough structure.
- Chill. Seriously. Cover the bowl and chill the dough for at least 45 minutes. This firms up the butter so your cookies don’t spread into sad, flat pancakes.
- Portion and bake. Preheat your oven to 375°F (190°C). Scoop 2-tablespoon balls of dough onto parchment-lined sheets. Leave 2 inches between them.
- Bake with trust. Bake for 10-12 minutes. The edges will look set, but the centers will still look soft and puffy. They will settle as they cool. This is key for chewiness.
- Cool correctly. Let cookies cool on the baking sheet for 5 minutes. Then transfer them to a wire rack to cool completely. This sets their structure.
Common Mistakes & How to Fix Them
Problem: Cookies spread too much and are thin.
Fix: Your butter was too warm or you skipped the chill. Always use room temp butter (cool to the touch) and never skip chilling. Also, check your baking soda isn’t old.
Red Velvet Chocolate Chip Cookies Recipe
The “Upgraded” Ingredient List
The Pro-Method (Step-by-Step)
Notes
Enjoy your homemade Red Velvet Chocolate Chip Cookies Recipe!
Nutrition Information
Problem: Cookies are cakey and dry.
Fix: You likely over-measured the flour. Spoon your flour into the measuring cup and level it off. Don’t scoop directly from the bag. And don’t overmix after adding the dry ingredients.
Problem: The red color is dull or brownish.
Fix: You used a weak gel or not enough liquid coloring. For a vibrant red, a high-quality liquid food coloring is actually best here. Don’t be shy with it.
Variations for the Adventurous Cook
Swap the semi-sweet chips for white chocolate chips. The contrast with the red dough is stunning and tastes incredible.
Add 1 tsp of instant espresso powder to the dry ingredients. It won’t taste like coffee. It will boost the chocolate flavor to a deep, rich new level.
For a festive cookies twist, roll the dough balls in coarse red sugar before baking. It adds a gorgeous sparkle and crunch. Perfect for holidays.
Nutrition Notes
- Calories: ~220 per cookie
- Total Fat: 12g
- Saturated Fat: 7g
- Cholesterol: 35mg
- Sodium: 140mg
- Total Carbohydrates: 28g
- Dietary Fiber: 1g
- Sugars: 17g
- Protein: 2g
Your Pro-Level Questions Answered
Can I make these without the food coloring?
You can, but they’ll be brown velvet cookies. The visual drama is part of the experience. For a natural option, try beet powder, but you’ll need more and the color will be more muted.
Why natural cocoa and not Dutch-process?
Natural cocoa is acidic. It reacts with the baking soda (a base) to create a better rise and that classic, slightly tangy red velvet flavor. Dutch-process is neutral and can result in a flatter cookie here.
How do I store them to keep them soft?
Once completely cool, store them in an airtight container at room temperature with a piece of plain bread. The cookies will steal moisture from the bread and stay soft for up to 5 days.

A Few Final Secrets
For the ultimate bakery-style look, I press a few extra chocolate chips on top of the dough balls right before they go in the oven.
Always use a light-colored baking sheet. Dark sheets absorb more heat and can cause the bottoms to burn before the centers are done.
If you want thick, bakery-style cookies, chill your scooped dough balls overnight. The longer chill means less spread and a denser, chewier interior. It’s worth the wait.
Now you have all my secrets. The cornstarch trick is your new power move. Go make these show-stopping cookies and taste the difference for yourself. If you’re looking for another stunning chocolate dessert, our decadent strawberry chocolate cake is a perfect next project. Did this change your cookie game? Tell me all about it in the comments below and leave a rating!
 Tired of the 5 PM dinner panic? Grab my new 30-Minute Cookbook!