

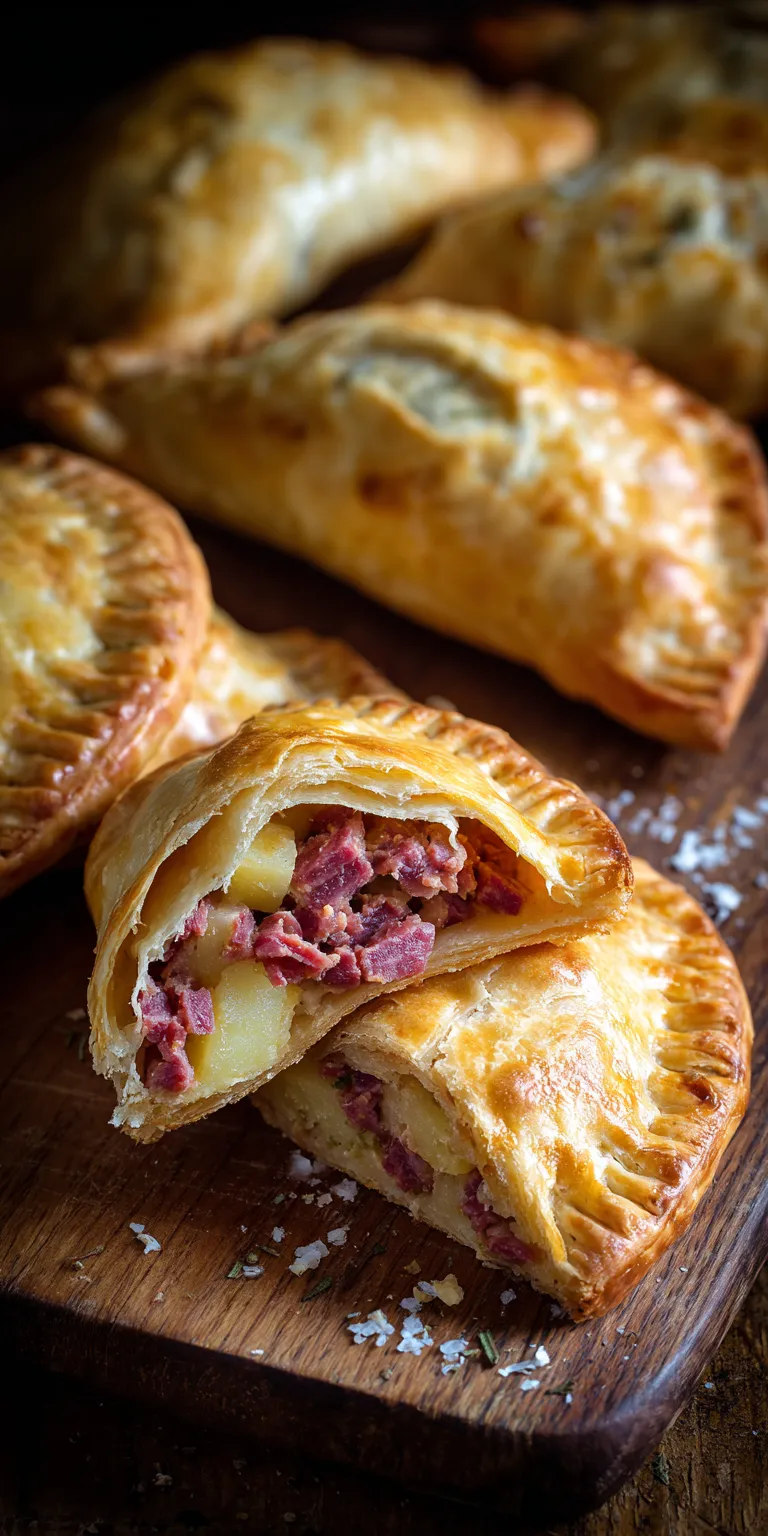
I published this recipe for Corned Beef Pasty Hand Pies a few years ago after a very soggy, very disappointing lunch. I’d packed a traditional pasty for a hike, and by the time I unwrapped it, the pastry was a sad, steamed mess. I was determined to create a version that could survive a backpack or a lunchbox and still taste incredible. The key, of course, is starting with great corned beef.
My secret weapon? A double layer of protection. I use a sturdy, flavorful pastry crust and a clever trick with the filling to lock in the juices. It took a lot of test batches, but I finally got it right. These little pies are my ultimate triumph in savory baking.
They are everything I wanted: deeply savory, perfectly portable, and utterly satisfying. Every bite takes me right back to the flavors of a classic British food shop, but made right in my own kitchen.
Recipe Overview
- Cuisine: British-inspired
- Category: Savory Baking, Portable Lunch
- Prep Time: 45 minutes
- Cook Time: 25 minutes
- Total Time: 1 hour 10 minutes
- Servings: 8 hand pies
Why This Recipe is So Special
This isn’t just another meat pie recipe. What makes it special is the filling method.
I cook the corned beef and vegetable filling completely before it goes into the pastry. This does two magical things.
First, it concentrates the flavors beautifully. Second, and most importantly, it removes excess moisture. A wet filling is the enemy of a crisp crust.
By starting with a dry, cooked filling, we avoid a soggy bottom. The result is a golden, flaky package that holds its shape perfectly. It’s ready for any adventure. For the most flavorful results, be sure to check out our guide to the best corned beef you can buy or prepare.
The Full Ingredient List
Gathering everything before you start makes the process so much smoother. Here’s what you’ll need.
Corned Beef Pasty Hand Pies Recipe
The Full Ingredient List
My Step-by-Step Method
Notes
Enjoy your homemade Corned Beef Pasty Hand Pies Recipe!
Nutrition Information
- For the Pastry Crust:
- 3 cups all-purpose flour
- 1 teaspoon salt
- 1 cup (2 sticks) cold unsalted butter, cubed
- 6 to 8 tablespoons ice water
- 1 large egg (for egg wash)
- For the Filling:
- 1 tablespoon olive oil
- 1 small onion, finely diced
- 2 cloves garlic, minced
- 12 ounces cooked corned beef, finely chopped
- 1 cup finely diced russet potato
- 1/2 cup finely diced carrot
- 1/2 cup finely diced rutabaga or parsnip
- 2 tablespoons Worcestershire sauce
- 1 tablespoon stone-ground mustard
- 1/2 teaspoon black pepper
- 1/4 cup beef broth
My Step-by-Step Method
Follow these steps in order for the best results. I promise it’s easier than it looks!
- Make the dough first. In a large bowl, mix the flour and salt. Add the cold butter cubes. Use a pastry cutter or your fingers to work the butter into the flour until you have pea-sized crumbs.
- Add the ice water, one tablespoon at a time. Mix with a fork until the dough just comes together. Divide it into two discs, wrap in plastic, and chill for at least 30 minutes. This chill time is non-negotiable for flaky layers.
- While the dough chills, make the filling. Heat olive oil in a large skillet over medium heat. Add the onion and cook until soft, about 5 minutes. Add the garlic and cook for 1 more minute.
- Stir in the diced potato, carrot, and rutabaga. Cook for 5 minutes, stirring often. Pour in the beef broth, cover, and let the vegetables steam until just tender, about 8-10 minutes.
- Uncover the skillet. Add the chopped corned beef, Worcestershire sauce, mustard, and pepper. Cook, stirring, until the liquid has completely evaporated. Let this filling cool completely.
- Preheat your oven to 400°F (200°C). Line a baking sheet with parchment paper.
- Roll out one dough disc on a floured surface to about 1/8-inch thickness. Use a bowl or large cutter to cut out 6-inch circles. Re-roll scraps as needed.
- Place a generous 1/3 cup of the cooled filling on one half of each dough circle. Leave a 1/2-inch border.
- Beat the egg with a splash of water. Brush this egg wash around the edges of the dough. Fold the empty half over the filling to create a half-moon shape.
- Crimp the edges firmly with a fork to seal. Transfer each hand pie to the prepared baking sheet. Cut 2-3 small slits in the top of each pie for steam to escape. Brush the tops with the remaining egg wash.
- Bake for 22-25 minutes, or until the pastry is a deep, golden brown. Let them cool on the pan for at least 10 minutes before eating. They are delicious warm or at room temperature.
My Top Tips for Success
- Keep everything cold. Cold butter and cold water are the keys to a flaky pastry. If your dough gets warm, pop it back in the fridge for 10 minutes.
- Let the filling cool. A hot filling will melt the butter in your dough and make it greasy. Patience here makes a huge difference.
- Don’t skip the egg wash. It gives the pies that beautiful, shiny, professional-looking finish.
- Make a double batch and freeze some! These freeze beautifully before baking. Just add a few extra minutes to the baking time straight from the freezer.
Common Mistakes to Avoid
I’ve made these mistakes so you don’t have to. Here’s how to fix them.
Mistake: A soggy, undercooked bottom crust. This usually means the filling was too wet or the oven wasn’t hot enough. Make sure you cook off all the liquid in the filling and use a preheated oven. Baking on parchment paper also helps.
Mistake: Butter leaking out during baking. This happens if the butter in the dough gets too warm or the edges aren’t sealed well. Chill your dough properly and press those edges hard with a fork.
Mistake: Dry, tough pastry. You likely overworked the dough or added too much flour while rolling. Handle the dough gently and use just enough flour to keep it from sticking to your surface.
NUTRITION INFORMATION
- Calories: ~420 kcal
- Carbohydrates: 32g
- Protein: 14g
- Fat: 26g
- Saturated Fat: 14g
- Cholesterol: 95mg
- Sodium: 680mg
- Fiber: 2g
- Sugar: 2g
FREQUENTLY ASKED QUESTIONS
Can I use store-bought pastry dough?
You absolutely can! For a quick fix, two sheets of store-bought pie crust or puff pastry will work. Just roll them out a bit thinner and follow the same assembly steps. My homemade crust has more flavor, but I totally get needing a shortcut.
What can I use instead of rutabaga?
No problem! Parsnip is my first choice for a swap. You could also use a little more potato and carrot, or even try a few tablespoons of frozen peas added at the very end of cooking the filling.
How do I store and reheat leftovers?
Store cooled pies in an airtight container in the fridge for up to 3 days. To reheat, place them on a baking sheet in a 350°F oven for about 10 minutes. This keeps the crust crisp. The microwave will make them soft.
Leave a Reply! (I’d Love to Hear From You!)
There you have it—my labor of love for a perfect portable lunch. Did you try my trick with the dry filling? Did your family go crazy for these? I read every single comment and love hearing your stories and seeing your photos. Tell me all about your baking adventure down below, and if you loved this recipe, please give it a 5-star rating! If you’re looking for another fantastic way to enjoy this cut of meat, our recipe for a classic baked corned beef brisket is a must-try. Happy baking, friends!
 Tired of the 5 PM dinner panic? Grab my new 30-Minute Cookbook!