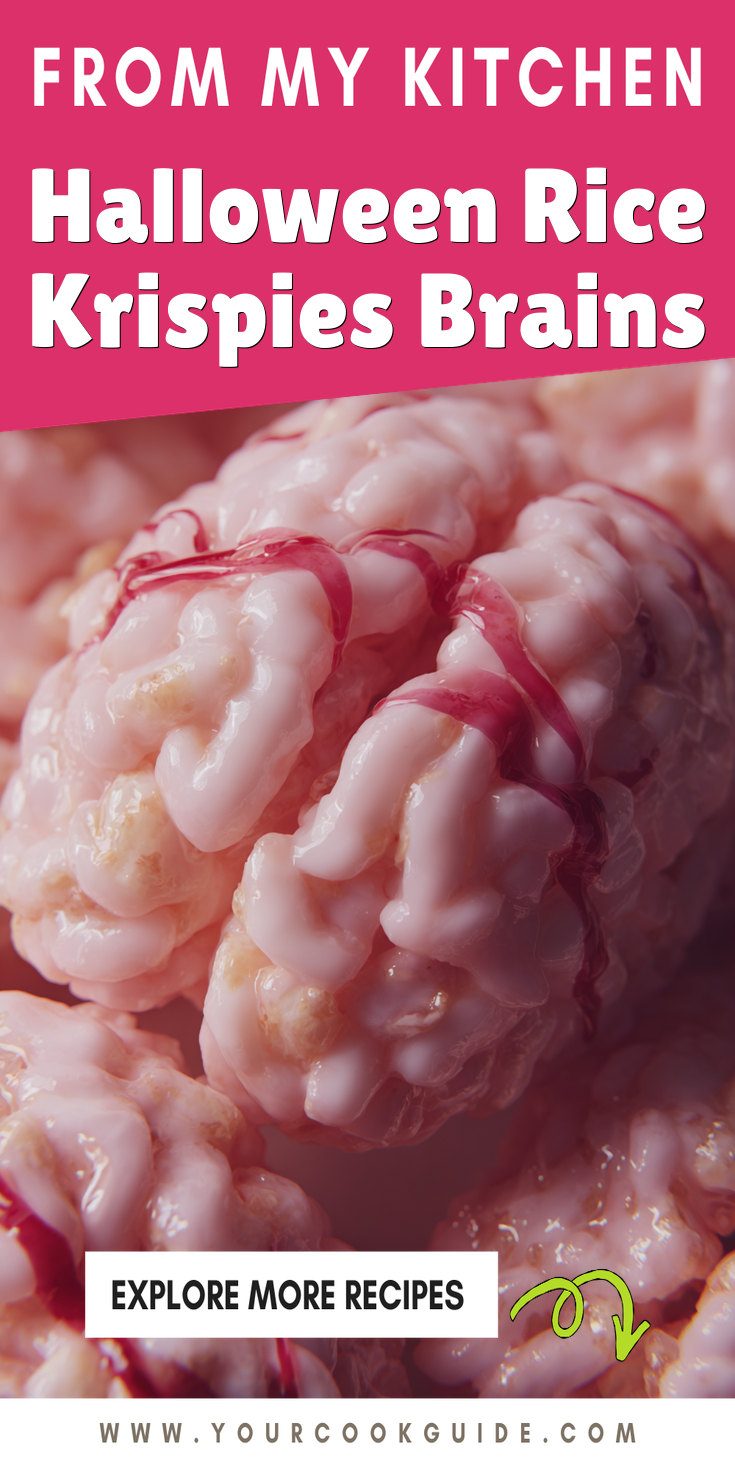
I believe the best party dishes are the ones that look like you spent hours, but secretly took you minutes. They let you enjoy your own gathering. This Halloween Rice Krispies Brains recipe is my ultimate trick for a stunning, stress-free treat. It’s perfect for when you want something show-stopping without the fuss of a main course like a hearty one-pan honey BBQ chicken and rice.
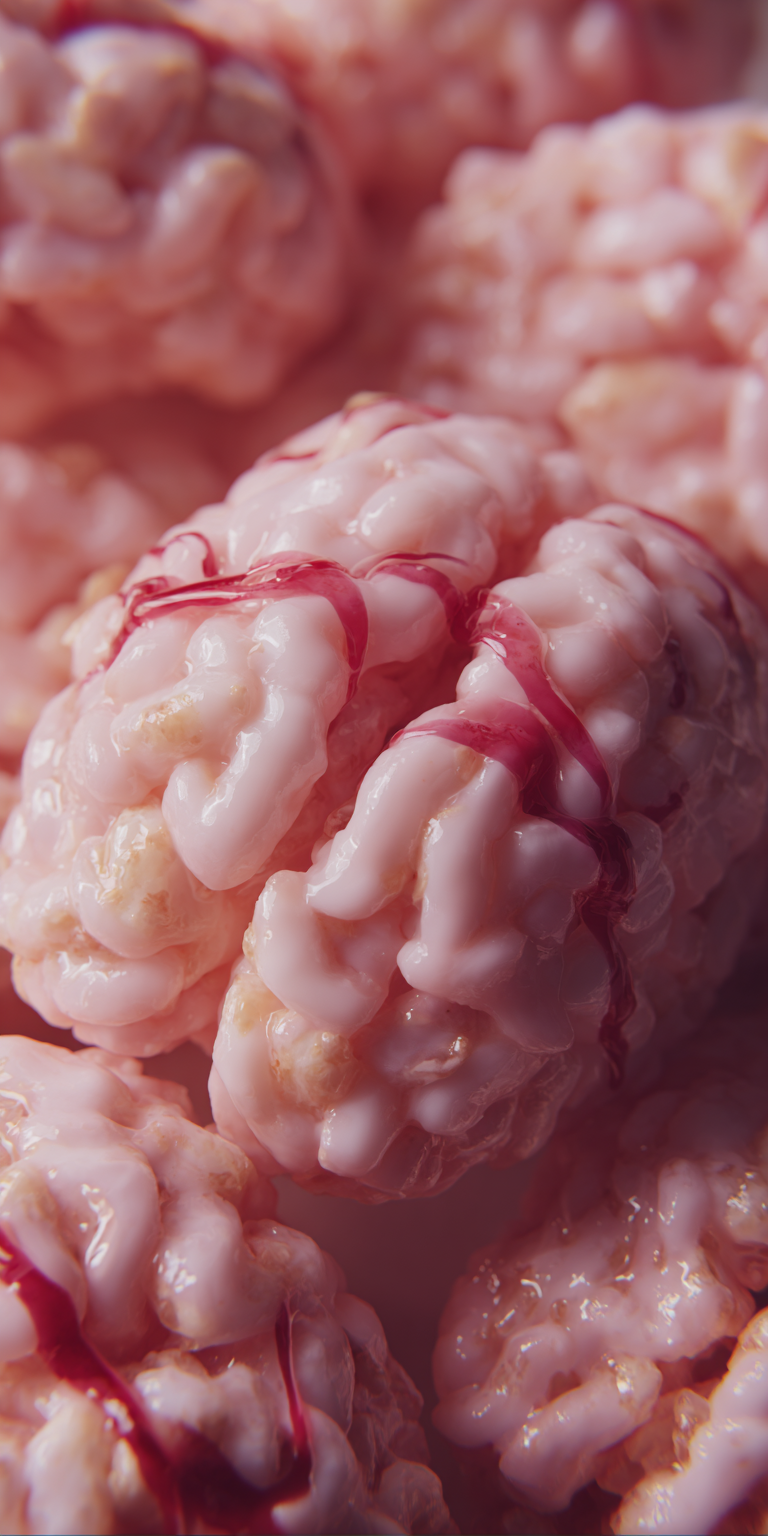
Imagine presenting a platter of eerily realistic, pink brain-shaped sweets. Your guests will gasp, then laugh with delight. I promise, the process is as fun and simple as making classic rice cereal treats. It’s a guaranteed conversation starter that tastes just as good as it looks.
This is my not-so-secret weapon for Halloween parties, movie nights, or any event needing a playful touch. It’s a project you can do with kids, and it stores beautifully. Let’s make your next party unforgettable, the easy way.
Recipe Overview
Here’s everything you need to know at a glance before we begin.
- Cuisine: American
- Category: No-Bake Dessert
- Prep Time: 20 minutes
- Cook Time: 5 minutes
- Total Time: 25 minutes (plus chilling)
- Servings: 6-8 brains
Why This is My Go-To for Guests
As a host, my main goal is to be present with my friends and family. This recipe lets me do exactly that.
It requires zero baking, which keeps the kitchen cool and calm. The ingredient list is short and simple, with no fancy equipment needed. The real magic is in the shaping and the dramatic finish, which feels more like a craft project than stressful cooking.
Halloween Rice Krispies Brains Recipe
The “Wow Factor” Ingredients
How to Prepare Your Dish (Step-by-Step)
Notes
Enjoy your homemade Halloween Rice Krispies Brains Recipe!
It’s incredibly forgiving. If a brain doesn’t look quite right, you can simply re-mold it. This dish delivers maximum visual impact with minimal chef effort, which is the holy grail of entertaining.
Make-Ahead Magic: My Hosting Secret
Prepping ahead is the single biggest trick I have for a relaxed party. This dish is a perfect candidate.
You can make the entire recipe 1-2 days before your event. Once shaped and cooled, wrap each brain tightly in plastic wrap. Store them in a single layer in a cool, dry place.
On the day of the party, all you have to do is unwrap them, arrange them on your platter, and add the final “bloody” drizzle. It’s the ultimate time-saver that makes you look impeccably prepared. This strategy works wonders for savory dishes too, like a quick high-protein garlic chicken fried rice.
The “Wow Factor” Ingredients
You likely have most of these at home already. The last two are the special effects stars.
- 3 tablespoons unsalted butter
- 1 package (10 oz.) regular marshmallows
- 6 cups Rice Krispies cereal
- 1-2 teaspoons raspberry or strawberry flavored gelatin powder (for color & flavor)
- Red gel food coloring
- 1/2 cup white chocolate chips or candy melts
- 1 teaspoon coconut oil or shortening
How to Prepare Your Dish (Step-by-Step)
Follow these simple steps for perfect, creepy-cute brains every single time.
- Prepare your pan: Lightly grease a large baking sheet or line it with parchment paper. This is where your brains will set.
- Melt the base: In a large pot, melt the butter over low heat. Add the marshmallows and stir until completely smooth and melted. Remove from heat.
- Add color and cereal: Quickly stir the raspberry gelatin powder into the marshmallow mixture. Then, immediately add the Rice Krispies cereal and stir until every piece is evenly coated and pink.
- Shape the brains: Let the mixture cool just enough to handle. With lightly greased hands, take a heaping cup of mixture and form it into a rough log shape. Place it on your prepared sheet.
- Create the details: Use the handle of a wooden spoon or a butter knife to press a winding, squiggly line down the center of each log to mimic a brain’s fissure. You can add smaller lines off the sides for more detail.
- Let them set: Allow the brains to cool and firm up completely at room temperature, about 1-2 hours.
- Make the “blood” drizzle: Melt the white chocolate with the coconut oil in a microwave-safe bowl in 20-second bursts, stirring until smooth. Stir in several drops of red gel food coloring until you achieve a deep, blood-red color. Let it cool slightly to thicken.
- The final touch: Use a spoon or a piping bag to drizzle the red chocolate over the brain fissures. Let the drizzle set before serving.
How to Serve This Like a Pro
Presentation turns great food into a memorable experience. A few simple touches make all the difference.
Arrange the brains on a dark-colored platter or a slab of slate for a dramatic, laboratory-like feel. Scatter a few plastic spiders or skeleton bones around for extra fun.
You can label them with a small chalkboard sign saying “Gray Matter” or “Brain Food.” For a more elegant look, use a white cake stand and fresh blackberries. The contrast is stunning.
Perfect Pairings (What to Drink & Serve With It)
This sweet snack is rich, so it pairs beautifully with lighter, tangy, or savory items.
For drinks, offer a sparkling cider punch with frozen grape “eyeballs.” A tart lemonade or even a cup of strong coffee helps balance the sweetness. For adults, a glass of prosecco or a dry cider is a lovely match.
On a snack table, place it alongside savory party snacks like pretzel rods, a sharp cheese board with crackers, or a bowl of spicy roasted nuts. The mix of sweet and salty will please every guest. For a heartier savory option to balance the table, consider a comforting dish like creamy smothered chicken and rice.
Nutrition Notes
This is a celebratory treat, best enjoyed in moderation. Here’s a general idea of what’s inside.
- This is a dessert treat and is high in sugar.
- It is not a significant source of protein or fiber.
- Portion control is easy—one brain per person is a perfect serving.
- For a slight boost, you can use a brown rice crisp cereal.
Your Entertaining FAQs
Here are answers to the questions I get asked most often when I serve this.
Can I make these gluten-free?
Absolutely. Just make sure to use a certified gluten-free crisp rice cereal. All the other ingredients are naturally gluten-free, but always check your labels to be safe.
My marshmallow mixture is setting too fast! Help!
This can happen. If it becomes difficult to shape, gently reheat the mixture in the pot over the lowest possible heat for just 15-20 seconds, stirring constantly. This will soften it right up without making it sticky.
What’s the best way to store leftovers?
Store any leftover brains in a single layer in an airtight container at room temperature for up to 3 days. You can place parchment paper between layers if you need to stack them. They may lose a little crispness but will still taste delicious.
I hope this recipe becomes your new favorite party trick. It has saved my hosting sanity more times than I can count. The joy it brings is absolutely worth the few minutes of simple, fun work.
Remember, the best gatherings are about the people, not perfection. This dish helps you focus on just that. Now you’re ready to impress without the stress.
I’d love to hear how your Halloween party went! Did your guests adore these brains? Leave a comment and a rating below!